
The turbocharger on a Td5 engine is a Garrett design that comes complete with a Wastegate Actuator mounted onto the turbo body. The wastegate actuator is highlighted in red below...

The adjustable control rod extends under boost pressure to move a pivoting shaft that opens a small valve internally in the exhaust side of the turbo.

The above photo shows a generic Wastegate Valve fitted inside a turbo-charger. The control rod can be seen attached to the outside of the valve stem. The wastegate valve opens internally into the exhaust side of the turbo body and allows the exhaust stream to by-pass or 'bleed' away from the spinning turbine thus reducing the generated 'boost' pressure in the inlet manifold.
The function of the wastegate-valve is crucial to stop the turbo over-boosting the engine and things quickly going BOOM.
OPERATION AND INSTALLATION
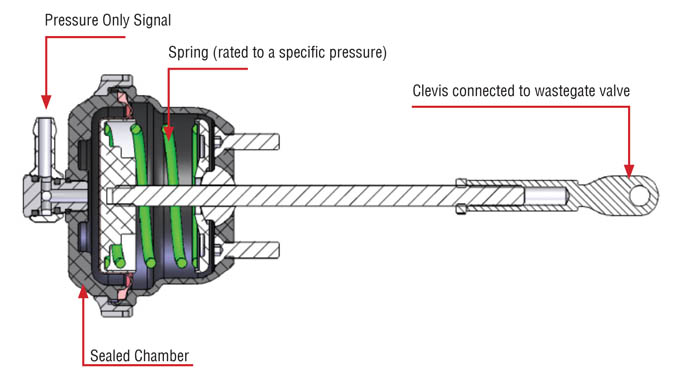
The body of the Wastegate Actuator is bolted to the body of the turbocharger and it contains a strong spring and diaphragm that normally hold the wastegate valve in a closed position.
When sufficient air pressure is applied to the actuator, the spring will compress and extend the control rod which in turn opens the wastegate valve. The pressure is supplied via a small-bore hose connected to the Intercooler intake. The available pressure is itself generated by the spinning turbine.
There is not much in Rave about the operation or installation of the Wastegate on the Td5 Discovery other then it's connection to the 'Wastegate Modulator'. (see below).
PROBLEMS WITH THE WASTEGATE.
The turbocharger produces maximum boost at around 3000rpm. If the engine is driven gently and economically it will seldom get to 3K rpm!!. Long periods of non use won't help either. If the wastegate mechanism is seldom operated, the physical valve inside the turbo can seize due to the intense heat and the deposits from the exhaust stream,
I tried to move the wastegate operating arm manually using a wrench clamped onto the shaft. Nothing would move either back or forth. I had watched some YouTube vids to get an idea of what to expect, but the lack of any movement was a worry and I had to investigate more.
It's also possible that the Wastegate Actuator can develop an internal leak from a worn or punctured internal diaphragm.
REMOVING THE WASTEGATE ACTUATOR.
The two 10mm nuts holding the actuator body to the turbo body are easily accessible. The clevis-pin connecting the arm to the wastegate valve is nicely hidden under the heat shield. It is possible to spray the valve shaft housing with lube to help free it up, but better access will be gained by removing the heat shield.
There are three bolts that hold the heat shield onto the exhaust manifold. Two have easy access, but the third one is hidden and fiddly to get at. It is screwed into the hottest part of the exhaust manifold and will almost certainly be seized and ready to snap off.
As expected, the third bolt was very tight and I was weary of shearing the head. That would allow the heat shield to just rattle away and it could even fall down onto the turbo body. I decided to drill out the rivets holding the heat-shield upper panels together and to bend the upper panel to allow access to the control rod. It was easy enough to re-secure the panels with two small nuts and bolts.
Once removed it was much easier to physically move the rod against the pressure of the internal spring.


I am assuming that the fitted actuator has the same 'spec' for all Td5 engines? I find myself wondering what the internal springs natural tension is as opposed to the 'applied' tension from the control rod adjustment? I'm thinking that springs of differing 'strengths' will react faster/slower to the same applied pressure?... That would in turn effect the reaction time and the physical movement on the wastegate valve spindle.. Hmm, more research needed!!
WASTEGATE SPINDLE.
Attention then turned to the wastegate valve operating spindle mounted on the turbo body.
Here is a photo from the Web that shows a typical Wastegate Valve mounted onto the exhaust side of the Turbocharger...

The spigot above the thumb is where the Actuator control rod attaches.
Liberal spraying of WD and some pliers soon had the lever shaft moving freely. I found that it will only move back and forth about 1/3 of a turn..
I read somewhere that lubricating the shaft is not recommended due to the harsh operating temperatures and the risk of the lube gumming-up in there.

The linear movement of the control rod is limited by
the spring compression in the actuator body. It seems all the 'action' takes place via this controlled little movement. At rest, the control rod must hold the spindle closed, otherwise the pressure building exhaust stream will be bled away from the turbine via the open valve which can only decrease the available generated boost.
BENCH TESTING THE ACTUATOR.

The control rod is fitted with a lock-nut and a black knurled rotary adjuster to alter its length and adjust the available boost. This is a factory set adjustment and there is no mention in Rave about altering it in service.
Altering the length of the control rod has a direct effect on the available boost pressure. Turning the adjuster just one turn can bring benefits or indeed downfalls!!. Caution is advised, but it is now a possibility.
Manually extending the control rod against the pull of the spring is physically demanding and I got to wonder just how much pressure is needed to operate it? Even at this stage I was unsure whether the unit was vacuum or pressure fed.

I placed a bicycle stirrup pump onto the hose connection and used some blue tape as a visual marker. The pump is fitted with a wide reading gauge but it's accuracy is untested.

...this is at rest or zero psi...

..and this is maximum extension at 20 psi.
The control rod started to lift around 10psi and extended smoothly. I kept the pressure on for a while to check the unit was airtight.
When fitting the Actuator back onto the turbo, I used the pump to easily align the control rod end with the wastegate valve shaft, making easy work attaching that fiddly clevis-pin.

So I am now confident that the Wastegate Actuator and the valve in the turbo are working together as they should. I still need to check the solenoid modulator and it's pipework.
ADJUSTING THE BOOST.

Just for the record, when I dismantled the adjuster I was careful to record the locknut position by carefully counting the screw threads visible.

I made the above notes after reading that even half a turn can make a difference. I went ahead and shortened the rod to show 12 threads before re-mounting it on the turbo body. In theory it should increase the boost.
I now have to connect the Nanocom and study the boost readings closely to assess the situation..... (Update...This 'situation' is still ongoing and is detailed more in other blogs).
THE WASTEGATE MODULATOR.
Tracing the path of the small-bore rubber hose attached to the Wastegate Actuator will lead to the Wastegate Modulator. The body of the modulator is bolted to the side of the engine block.

Td5 Defenders are not fitted with the modulator and their Wastegate Actuator is plumbed directly into the Turbo outlet via the small-bore hose. Both versions use the generated boost pressure to open the Wastegate Valve once the boost pressure builds and overcomes the resistance of the Actuator spring.
A Td5 Discovery engine will get 'on boost' quicker and for longer then a Td5 Defender. Eliminating 'wastegate creep' is one reason for fitting the solenoid controlled valve onto the engine. There is a performance gain to be had this way.
See also: Td5 D2 engine - Wastegate Modulator
No comments:
Post a Comment
Note: only a member of this blog may post a comment.